Written by
Ethan Reeves
Publish Date
Category
Editing Tips

Your topic is fine. Your camera is fine. Your lighting could probably be better, but it's not the reason people are leaving your videos at the 47-second mark. I've overseen editors cutting hundreds of talking head files across dozens of channels, and I can tell you with near certainty: the real problem is your edit.
When it comes to talking head video editing for YouTubers, the gap between a video that holds strong retention and one that bleeds viewers from the first minute almost always comes down to a handful of editing choices nobody told you to make.
After applying these editing principles across 200+ videos on channels ranging from 5K to 800K subscribers, we've consistently seen average view duration jump 15 to 25 percent. Not from better topics. Not from better cameras. From better edits.
Most creators look at a dipping retention graph and think they need a better hook or a more clickable title.
Sometimes, sure. But more often than not, the content is solid, it's just wrapped in an edit that doesn't respect how people actually watch YouTube.
TL: DR = The Core Editing Principles
The first 30 seconds decide everything. Cut the preamble. Open on your most interesting sentence.
Cut on energy, not on silence. Rhythm matters more than speed.
Give the viewer a new visual every 5 to 7 seconds: punch-ins, B-roll, text overlays, angle switches.
Audio is half the experience. Bad audio kills retention faster than bad lighting.
Use sound design as an active retention tool, not just background filler.
Captions are no longer optional; they're a retention tool.
Use AI tools as a first pass, then edit with human judgment. (Jump to AI tools section.)
End on value, not on a wind-down. Your ending edits affect your next video's performance.
YouTube Retention Benchmarks You Need to Know
Before we get into the editing specifics, let's put some numbers on the table because most creators have no idea whether their retention is normal or terrible.
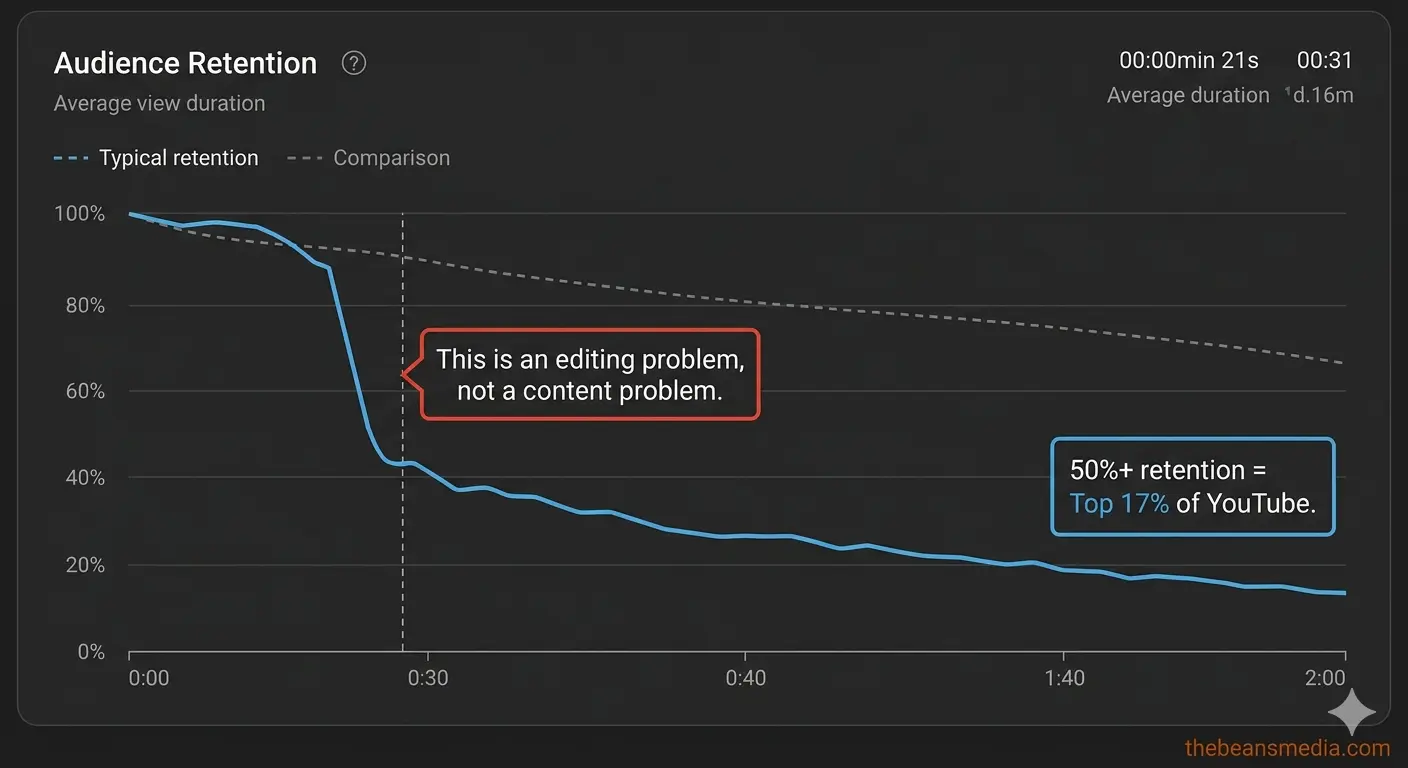
According to published research on YouTube viewer behavior, only about 16-17 percent of videos achieve an average view duration above 50 percent. The typical video retains roughly 24 percent of its audience by the final frame. And more than half of all viewers drop off within the first 60 seconds.
Read those numbers again. If your 10-minute video is holding 40 percent retention, you're already outperforming most of YouTube. If you're at 55 percent or higher, you're in elite territory. When it comes to editing talking-head videos for YouTube, these benchmarks tell you exactly where you stand, and the techniques in this guide are what separate the 30% range from the 50+ range.
YouTube's algorithm also specifically tracks your 30-second retention as a signal. If viewers leave before that mark, the algorithm interprets it as a content quality problem and throttles your impressions.
The YouTube Creator Academy documentation confirms that early retention is one of the strongest signals the platform uses to decide whether to push your video to new audiences. So the editing decisions you make in that first half-minute have algorithm consequences, not just viewer consequences.
The First 30 Seconds Decide Everything
Here's something we've seen play out dozens of times: two videos on the same channel, by the same creator, on similar topics. One has a 55% average view duration. The other drops to 35 percent.
The difference? The first video opened with the creator mid-thought, already into the meat of the topic.
The second opened with fifteen seconds of “Hey guys, welcome back to the channel, if you're new here make sure to subscribe, and today we're going to be talking about..."
That intro ritual is killing your video. Not because it's bad content, but because it's not content at all. It's preamble. YouTube viewers in 2026 have been trained by millions of hours of content to expect value immediately. The moment their brain registers this is the setup before the setup, they bounce.
What to do instead: open your edit on the most interesting sentence from your first two minutes of footage. Scrub through your raw file, find the moment where you say something that would make a friend lean in, and start there. Cut everything before it.
If your video is about five camera mistakes, don't open with "today we're covering five camera mistakes." Open with "This one setting is the reason your footage looks like a soap opera," then smash-cut to your normal intro if you must have one.
Your first visual cut matters too. If the first thing a viewer sees is a static wide shot of you at your desk for eight unbroken seconds, you've already lost momentum.
Within the first three to five seconds, give them a visual change, a punch-in, a text overlay reinforcing your opening line, or a quick B-roll flash of whatever you're referencing. That first cut signals to the viewer's brain: this video is edited, someone cared about this, it's going to move.
Pacing Is Not About Cutting Fast
The most common editing advice on YouTube is "cut out the dead air." And yes, removing long pauses where you're collecting your thoughts is basic hygiene. But many creators and editors stop there. They strip every silence, tighten every gap, and deliver a video that technically has no wasted space but feels like a machine gun firing words at the viewer.
That's not good pacing. That's just fast.
Good pacing is about rhythm, and rhythm requires variation. Think about how a conversation actually flows. There are moments of intensity where someone's making a point, and then micro-pauses where the listener processes what was just said. When you strip all of those out, you create a wall of sound that's exhausting to watch.
Viewers might not consciously think, "this video has no breathing room," but their brains register the fatigue, and they click away.
Here's the rule we use: cut on energy, not on silence. If the creator's energy dips, they repeat themselves, hesitate, lose the thread, that's where you cut. But if there's a natural half-second pause after a strong statement? Leave it. That pause gives the viewer a moment to absorb the point. It makes the next sentence land harder.
A practical way to develop this instinct: watch your edit back without looking at the screen. Just listen. If it sounds like a real person talking with conviction, the pacing is right. If it sounds like someone reading a teleprompter with all the gaps removed, you've over-cut.
Long-Form vs. Short-Form Pacing
One thing the pacing conversation usually ignores: a 60-second Short needs completely different pacing than a 15-minute tutorial. For Shorts, cut tighter; almost every sentence should carry new information, and pauses need to be minimal because the viewer's thumb is hovering over the scroll.
For long-form talking head content, let the footage breathe more. Viewers who clicked on a 12-minute video have committed to spending time with you. Rapid-fire pacing for 12 straight minutes is exhausting. Give them valleys between the peaks.
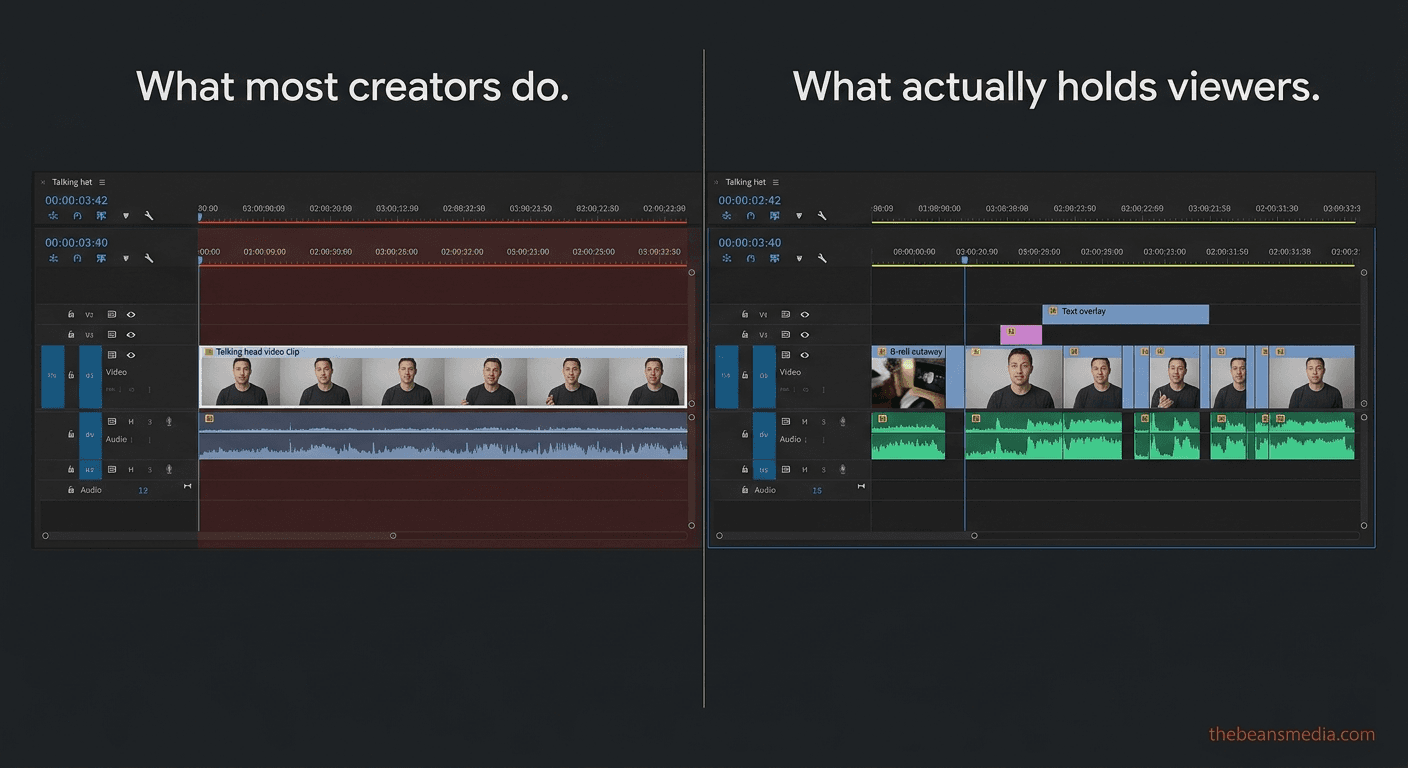
Talking Head Video Editing for YouTubers: The Visual Change Rule
The human brain is wired to pay attention to change. When something in your visual field shifts to a new angle, a new element, or movement, your brain perks up and re-engages. When nothing changes, it wanders. This is the core principle behind what editors and retention strategists call a pattern interrupt: a deliberate break in the expected visual or auditory flow that resets the viewer's attention.
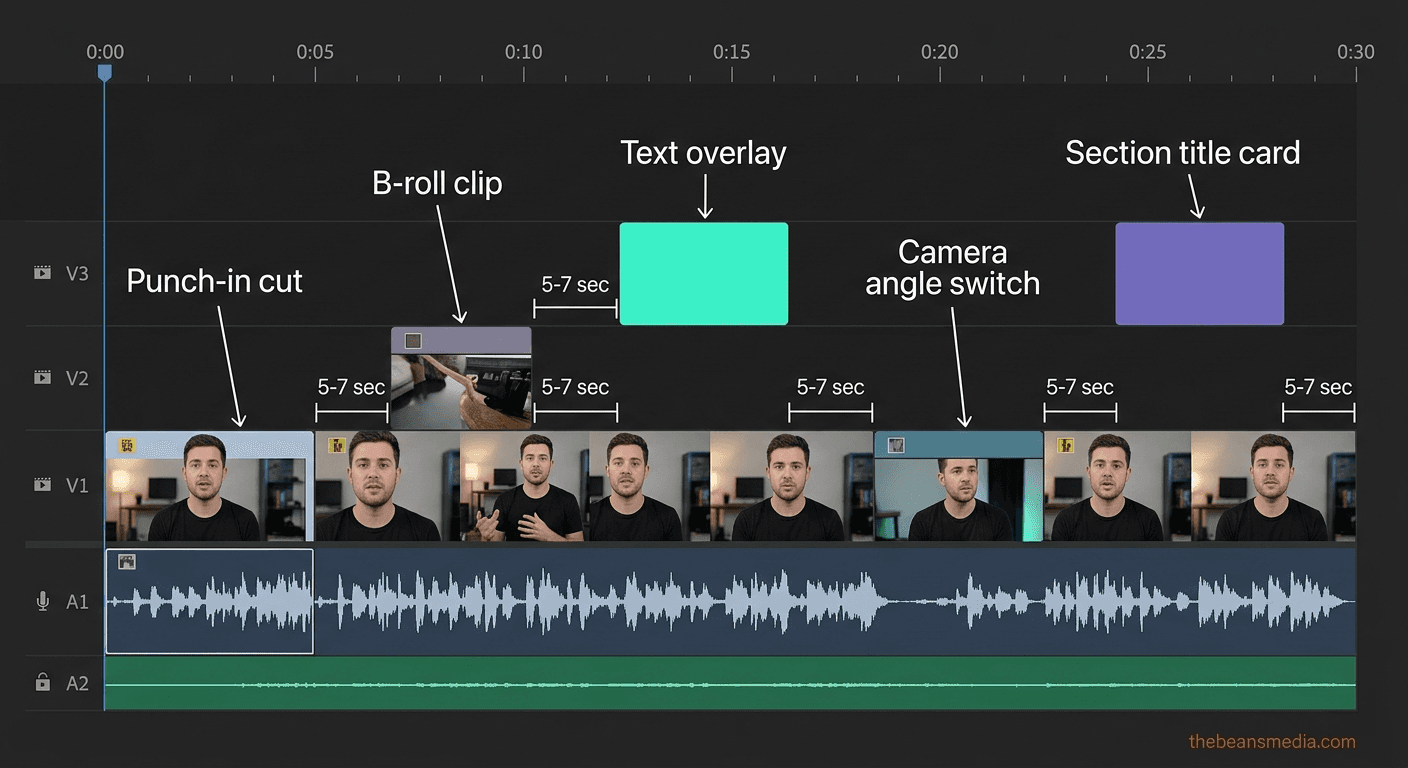
Research on visual attention suggests that this reset needs to happen roughly every 5 to 7 seconds. For talking head content, where you're one person in one spot with an inherently static frame, this is critical. If your edit doesn't compensate for regular pattern interrupts, you're fighting human biology.
Punch-ins, B-roll cuts, text overlays, camera angle switches, title cards, and even sound cues are all types of pattern interrupts. Once you start thinking in those terms, you'll never look at a talking head timeline the same way.
Punch-Ins and Zoom Cuts
This is your workhorse. A punch-in is when you crop tighter on the same shot, going from a medium shot to a close-up. Use these to emphasize a key point, cover a jump cut where you removed a sentence, or simply reset visual attention every five to eight seconds during a long stretch.
In Premiere Pro, this means scaling your clip to 120-130 percent and repositioning it. In Final Cut Pro, use the Transform controls. Simple, but it's the single most effective tool for talking head retention.
B-Roll That Illustrates, Not Decorates
Use B-roll when you're referencing something specific, a product, a place, a screen recording, or a process. Don't use B-roll as wallpaper just because you feel like the video needs "more visuals."
Random stock footage of someone typing on a laptop while you talk about marketing strategy doesn't add value. It distracts. B-roll should illustrate, not decorate.
Multi-Camera Setups
If you're still shooting with a single camera, this is one of the highest-impact upgrades you can make for relatively low cost. A two-camera setup, one tight, one wide, gives you natural visual variety without relying entirely on digital punch-ins.
The cuts between angles feel more cinematic and less "edited around mistakes." Industry data consistently shows that videos with multiple camera angles have significantly higher retention than single-angle talking-head videos. Even two angles are a massive upgrade over one.
That covers the camera and footage side of pattern interrupts. Now let's talk about the graphics layer, the elements you add in post that keep the viewer's eyes engaged.
Text Overlays and Title Cards
Put key terms, numbers, or short phrases on screen when you say them. If you mention "a 43 percent increase in click-through rate," put "43% CTR Increase" on screen. This provides visual variety and reinforces the information through a second channel, allowing the viewer to read and hear it simultaneously.
Keep it clean: two to five words, large enough to read on a phone. Full-screen title cards work for section transitions. A brief card lasting one to two seconds acts as a chapter marker, re-engaging attention and helping viewers mentally organize your content.
Screen Recordings and the Ken Burns Effect
If you're in tech, marketing, education, or any tutorial-heavy niche, screen recordings are one of your most underused visual tools. Cutting from your face to a screen walkthrough of exactly what you're describing gives the viewer proof, not just an explanation.
One more technique worth knowing: the Ken Burns effect, a gentle, slow zoom or pan on a static image or screenshot. It adds motion to what would otherwise be a dead frame. Most editors overlook this, but it's extremely effective when showing a still graphic.
The goal isn't to cram in as many visual changes as possible. It's never too let the screen sit unchanged for so long that the viewer's brain checks out. Scrub through your timeline and look for any stretch longer than seven seconds with no visual shift. Those are your danger zones.
Audio Is 50% of Retention (and Most Creators Ignore It)
Most YouTubers spend more time choosing a thumbnail font than they do mixing their audio. And audio is literally half the experience of watching a video.
Bad audio makes people leave faster than bad lighting. We've seen channels with mediocre visuals and excellent audio hold strong retention, while channels with beautiful 4K footage and echoey, inconsistent audio bleed viewers within the first minute. Your audience will forgive a slightly dark shot. They will not forgive audio that sounds like you're recording in a bathroom.
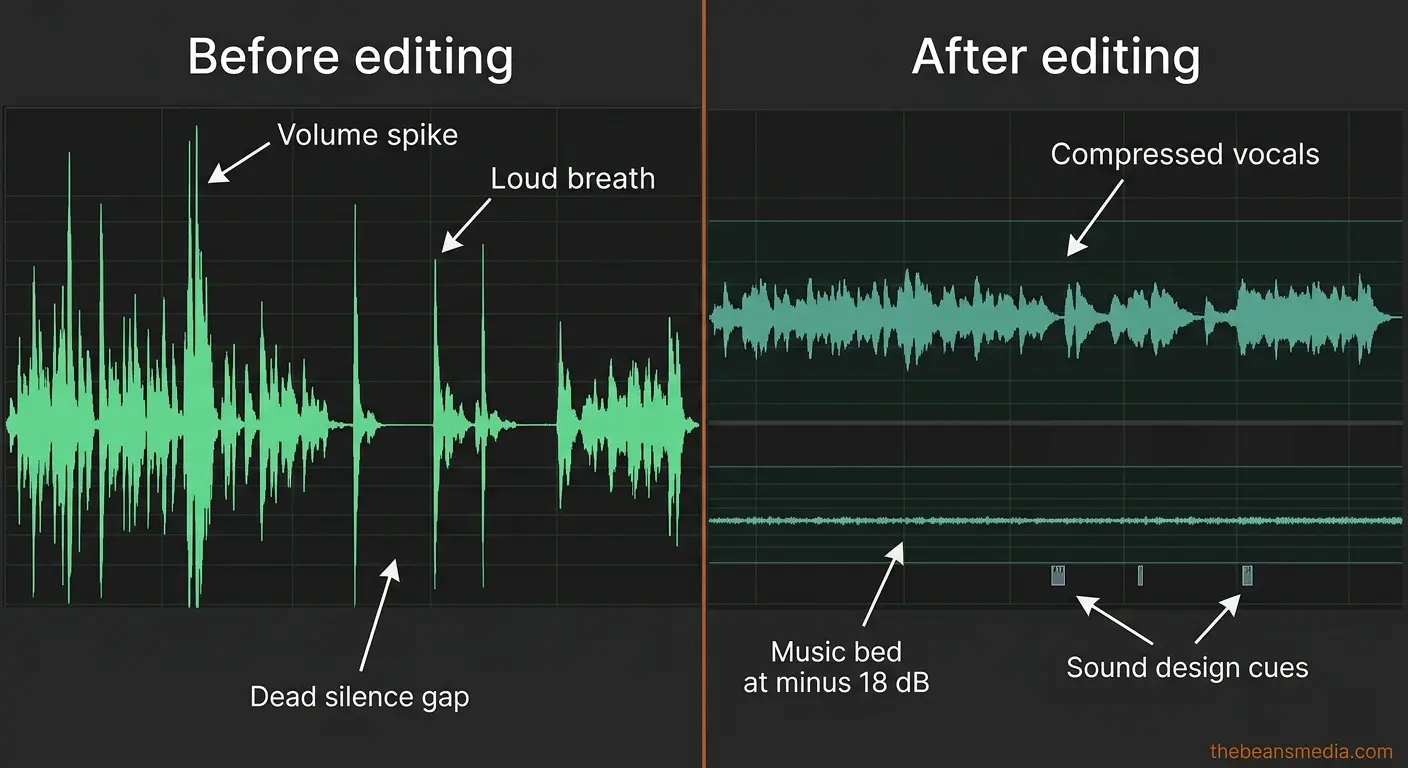
Background music level and tempo: Music should be felt, not heard. It should sit 15 to 20 dB below your voice, just enough to fill the sonic space, never enough to compete with your words. If a viewer could identify the song, it's too loud.
But volume is only half the equation. The tempo of your background track should shift with the energy of your content. Slower beats, around 60 to 80 BPM, work during teaching or reflective moments. Faster rhythms, 100 to 120 BPM, build energy during transitions and key reveals. And one of the most powerful moves you can make is dropping the music to silence right before a major point. That sudden quiet creates an emphasis the viewer feels, even if they can't name it.
Breath sounds: Surprisingly divisive in the editing world. Some editors strip every breath. Don't. Breaths are natural human sounds, and removing all of them makes audio feel synthetic. Instead, reduce the loudest breaths and the gasps between long sentences by about 6 to 10 dB. Leave the quiet, natural ones alone.
Consistency: Run a compressor on your vocal track. Not heavy, just enough to even out volume so quiet moments and excited moments are closer in level. A gentle compressor with a 3:1 ratio and moderate threshold handles this. Viewers on phone speakers or earbuds will thank you.
Room tone: When you cut a section of audio, don't leave dead silence in the gap. Export a few seconds of your room's ambient noise and use it to fill gaps. Dead silence between sentences is jarring. Consistent room tone makes edits invisible.
Sound Design: Audio as a Retention Tool, Not Just a Cleanup Job
Everything above treats audio as something to clean up and balance. But there's a whole other dimension that most talking-head creators miss: sound design as an active retention tool.
Subtle transition sounds a soft whoosh between sections, a gentle pop when a text overlay appears, a low riser building before a key reveal; these are auditory pattern interrupts. They reset the viewer's attention through their ears, just as a visual cut resets it through their eyes. When a viewer hears that quiet "swoosh" as you move to your next point, their brain registers the transition and re-engages.
Now, a word of caution. Around 2021, the "Hormozi editing style" popularized aggressive sound design in talking-head content, loud whooshes, hard bass hits, and constant audio stimulation. It worked for a while, but by 2026, audiences had gotten fatigued by the overkill. The current best practice is what some editors call dynamic minimalism: keep the retention mechanics of intentional sound cues, but strip the aggressive aesthetic.
That means: use transition sounds, but keep them subtle. Use emphasis sounds on text overlays, but don't make them louder than your voice. Use risers before reveals, but make them feel natural rather than cinematic. The sound design should be felt as polished, not heard as production.
AI Audio Cleanup Tools Worth Knowing
Cleaning up the talking head audio used to take 20 minutes of manual noise reduction. Now there are AI tools that handle it in one click. Adobe's AI speech enhancement, built into Premiere Pro, can clean up room echo and background noise remarkably well. Descript's Studio Sound feature does something similar.
These are not replacements for good recording practices, but as a cleanup step in post, they're genuine time savers. Use them as a first pass, then fine-tune manually where needed.
Captions Are No Longer Optional
This is one of the biggest shifts in talking head editing over the past two years, and if you're not doing it, you're leaving retention on the table.
A huge percentage of mobile viewers watch with sound off at least some of the time, scrolling in bed, sitting in public, or multitasking. If your video has no captions, those viewers leave. Period.
But captions aren't just an accessibility feature anymore. The animated, word-by-word caption style popularized by CapCut and the Captions app has become a visual retention tool in its own right. Each word lighting up as it's spoken gives the viewer something to track, keeping their eyes locked on the screen.
A few guidelines: animated captions work best on short-form and punchy long-form content. For a slow, detailed 20-minute tutorial, they can feel hyperactive. Match the caption energy to the video energy. Place them in the lower third without covering your face.
One thing to watch: captions interact with the text overlays you're already using. If you have a stat on screen AND animated captions at the bottom, the viewer's eyes have too many places to go. When a text overlay appears, simplify or temporarily remove the animated captions. Let each element have its moment.
Color Consistency and Visual Polish
Even subtle color temperature shifts between clips, one looks warm and golden, the next looks cool and blue, break viewer immersion. It signals amateur editing to the viewer's subconscious, even if they can't articulate why something feels off.
You don't need to become a colorist. But you do need to do three things: match your white balance across all clips (if you shot with auto white balance, fix this in post), apply a consistent base color grade to everything (even a simple contrast and saturation adjustment applied uniformly), and check your edit on both a monitor and a phone screen before exporting.
What looks fine on a calibrated monitor can look wildly different on a phone, and that's where most of your viewers are watching.
AI Editing Tools That Actually Save Time on Talking Head Edits
If this article were written two years ago, this section wouldn't exist. But in 2026, ignoring AI tools for talking head content is like ignoring autofocus; you're making your life harder for no reason.
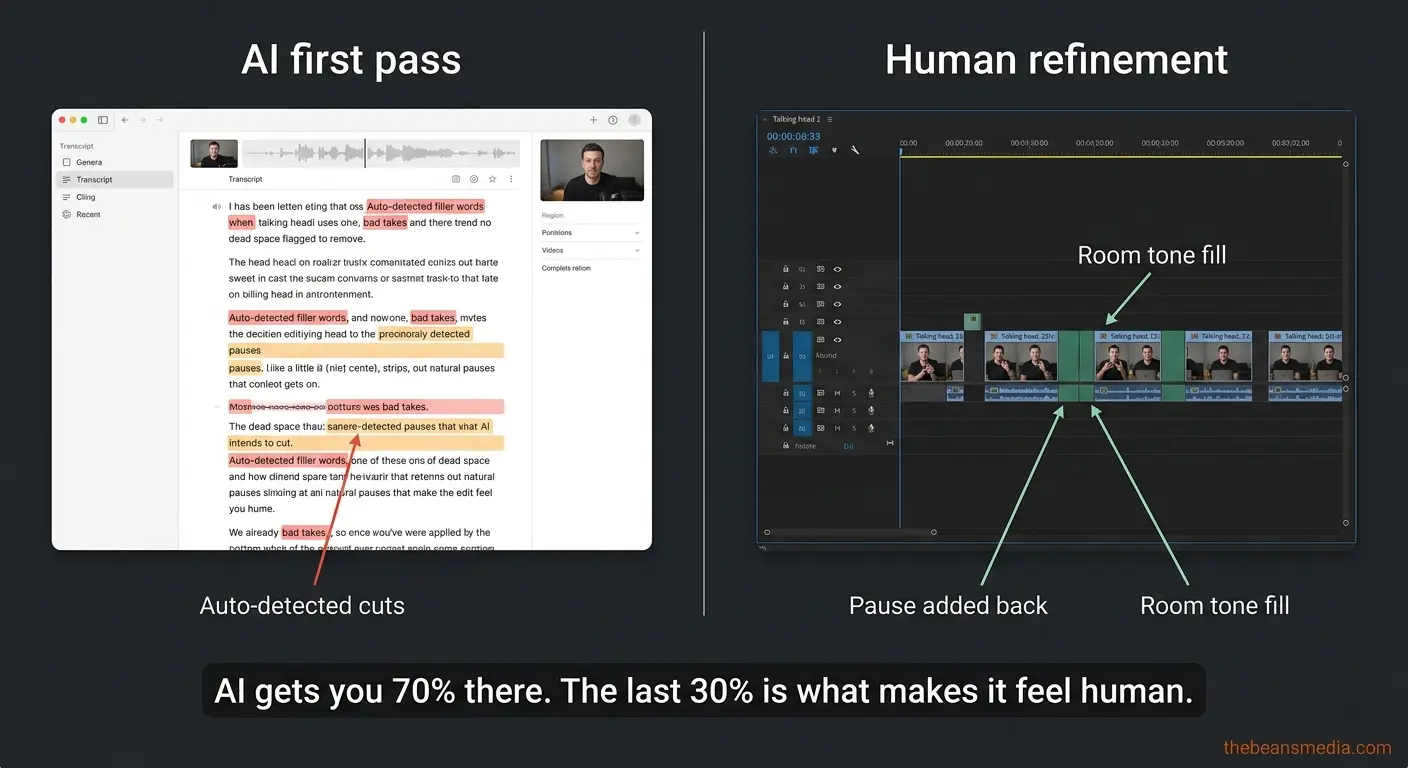
Here's what's genuinely useful right now: Premiere Pro's text-based editing lets you edit your video by editing a transcript, deleting a sentence from the text, and removing it from the timeline. Descript operates on the same principle and adds automatic filler-word removal. Gling AI is built specifically for talking head content and auto-detects dead space, mistakes, and filler.
Here's the catch, and this is important: every single one of these tools over-cuts. They strip too much. They remove the natural pauses we talked about in the pacing section. They create that robotic, machine-gun delivery.
So use them as a first pass to get the obvious junk out, then go back through manually and add breathing room back in. AI gets you 70 percent of the way there in 10 percent of the time. The last 30 percent, the part that makes the edit feel human, still requires your judgment.
The Ending Problem
Anyway, that's about it. If you enjoyed this video, make sure to like and subscribe, and I'll see you in the next one.
You've said it. I've said it. Everyone has said it. And it's a retention killer.
When viewers hear that wind-down language "anyway," "that's about it," "that's all I've got," they register that the value is over and click away. Your retention graph nosedives in the last 15 to 20 seconds, dragging down your average view duration percentage.
But there's a bigger algorithm angle most creators miss. YouTube doesn't just measure how long someone watched your video; it tracks whether they clicked to another video on the platform afterward. A strong end screen with a verbal callout to a specific next video doesn't just help your retention. It helps your session-start metrics, which YouTube uses to decide whether to recommend your content to new audiences.
Your ending isn't just a courtesy. It's an algorithm-critical editing decision.
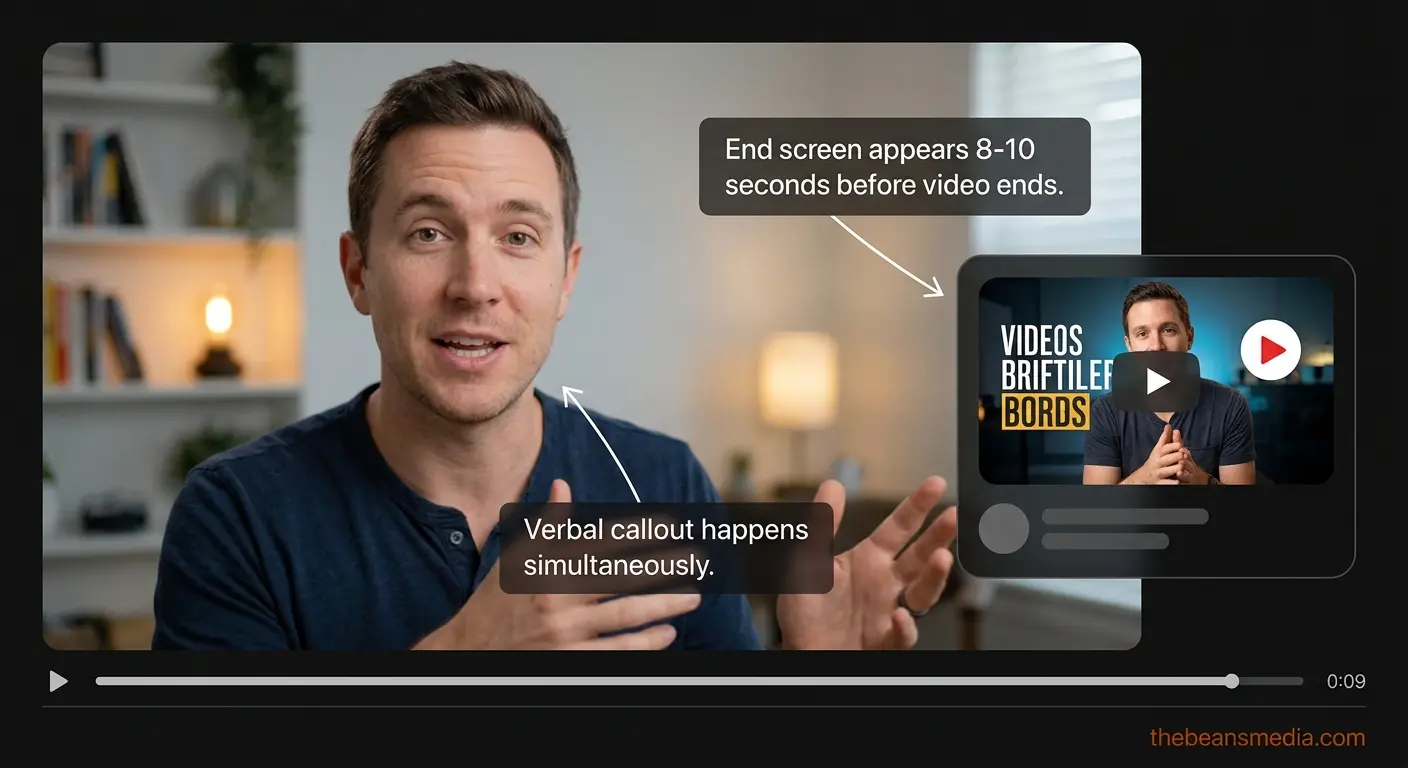
A better approach: end on your last real point. Deliver your final piece of value, then within one or two sentences, direct the viewer to one specific video and tell them why it's relevant. "I covered the lighting side of this in this video right here. It picks up exactly where this one leaves off." Then cut. Hard.
Time your end screen to appear with about eight to ten seconds remaining. Make sure your verbal callout matches the moment it appears on screen. No lingering, no waving, no five-second outro with subscribe animations.
Editing Your Talking Head Footage with Shorts in Mind
In 2026, Shorts are the primary discovery mechanism on YouTube. Most new subscribers come from short-form content, not long-form. Talking head editing for YouTubers doesn't stop at the long-form export. If you're not thinking about vertical clips during the edit, you're leaving your best growth tool on the table.
The smart move is to plan for repurposing during the long-form edit, not after. While you're cutting your main video, flag the three to five strongest 30 to 60-second segments where you said something punchy, surprising, or emotionally resonant that works standalone. Drop markers on your timeline.
When you cut those segments vertically, the composition rules change. Your face needs to be centered and larger in the frame. Text overlays need repositioning. B-roll that worked in 16:9 might not work in 9:16. Doing this during the edit, when you already have all the footage loaded, takes a fraction of the time it would take to revisit the project later.
What Actually Separates Videos People Finish
After overseeing edits on more channels than I can count, the pattern is clear. The videos people watch all the way through aren't the ones with the best topics or the fanciest cameras. They're the ones where the edit respects the viewer's attention at every moment, where every cut has a reason, the audio feels effortless, the pacing breathes but never drags, and the pattern interrupts land at just the right frequency.
Talking head video editing for YouTubers isn't about learning a hundred techniques. It's about internalizing a handful of principles: front-load the value, match your cuts to energy, give the eyes something new before they get bored, design your audio instead of just cleaning it, and end before you overstay your welcome, then applying them consistently, video after video.
The creators who figure this out don't just see higher retention. They see higher click-through on the next video, more comments, and more subscribers who actually come back. Because when someone finishes a video and feels like it was well-made, they trust you enough to click again.
That trust is built in the edit.
FAQ: Talking Head Video Editing
How do you make a talking head video not boring?
Use pattern interrupts, visual and auditory changes every five to seven seconds. Punch-ins, B-roll, text overlays, camera angle switches, and subtle sound cues all reset the viewer's attention. Pair that with pacing that has rhythm, not just speed, and audio that sounds clean and consistent.
How often should you cut in a talking head video?
Aim for a visual change every five to seven seconds. That doesn't always mean a hard cut; it can be a punch-in, text appearing, a sound cue, or B-roll. The goal is to reset the viewer's attention before their brain starts to wander.
What is the best software for editing talking head videos?
Premiere Pro and Final Cut Pro are the professional standards. Descript is excellent for transcript-based editing and filler word removal. Gling AI is built specifically for talking head content. For quick edits and captions, CapCut is surprisingly capable. The best tool is the one you'll learn deeply.
How long should a talking head YouTube video be?
As long as the content justifies and not a second longer. A tight 8-minute video with high retention outperforms a padded 20-minute video every time. Edit ruthlessly if a section doesn't add value; cut it regardless of how long you spent filming.
Do you need B-roll for a talking head video?
Not always, but you do need some kind of visual variety. If you don't have B-roll, use punch-ins, text overlays, screen recordings, or a second camera angle. A talking-head video with no visual changes will struggle to hold attention past the first minute.
How do you improve audience retention on YouTube?
Start with the edit. Open on your strongest moment, use visual pattern interrupts every five to seven seconds, design your sound, add captions, and end on value instead of a wind-down. These talking head video editing tips account for most of the retention difference between average and high-performing videos.
Should you use captions on talking head videos?
Yes. A large percentage of viewers watch with sound off on mobile. Animated captions also serve as a visual retention tool. Match the style to your content: energy, punchy animated captions for fast-paced content, cleaner static captions for slower tutorials.
Need help with your edits? Our talking head video editing service handles everything — from jump cuts to motion graphics — so you can focus on creating.